How to Blur in Davinci Resolve (Using Masking Tools)
Discover the simple steps to master blurring effects in Davinci Resolve, enhancing your video editing skills for professional-looking results.
DaVinci Resolve | Software | By Andrew Dilks
Learning how to blur in DaVinci Resolve opens up various editing options.
It’s a great technique to enhance transitions, as well as for obscuring particular subjects and objects from view.
I’ve used the blur technique in many circumstances that capitalize on the various possible methods.
This guide covers everything you need to know about blurring in DaVinci Resolve.
Table of Contents
How to blur in DaVinci Resolve – everything you need to know

DaVinci Resolve’s blur function has a wide variety of practical applications
Learning how to use the blur settings in DaVinci Resolve opens up many practical applications to use when editing videos.
The effect can be quickly applied to the entire footage to soften the image and make titles and text pop off the screen.
It’s also one of the most useful video editing skills for covering sensitive information, such as documents and license plates, that must be kept private.
The software comes with a range of blur types to choose from, including mosaic blur, gaussian blur, and zoom blur.
When combined with DaVinci Resolve’s powerful masking tools, it can also be used to enhance motion blur and other dynamic effects.
Let’s begin this step-by-step guide to blur in DaVinci Resolve with the basic application of the technique to general footage.
I’ll then cover how to track moving objects and add the desired blur to other elements.
Applying blur to footage

Applying a general blur to a clip is incredibly easy and can help titles stand out from the screen
Applying an overall blur that encompasses the entire screen in DaVinci Resolve is simple and can be accomplished with just a few clicks.
It’s a great way to enhance transitions and make it easier for your audience to view text on a title screen.
To apply the blur effect to the full image, follow these steps:
- Import the video in DaVinci Resolve you wish to apply the blur effect to
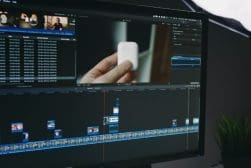
- Drag the clip onto your timeline on the Edit page
- Highlight the clip on the timeline, then select Open FX from the toolbox in the bottom left-hand corner of the interface
- Double-click on the type of blur effect you wish to apply to the footage
- Open the Inspector window in the top right-hand corner of the interface
- In the Inspector’s Effects tab, make any further fine-tuning to the blur
You’re ready to add titles, text, or other assets above the blurred footage in your DaVinci Resolve timeline.
Using masks to blur subjects

Using one of the selection tools in the Window options of the Colour Page makes it easy to add a mask for blurring faces.
One of the most common applications for the blur effect in DaVinci Resolve is to blur faces and obscure a subject’s identity.
It’s an effect that many will be familiar with from television documentaries that need to keep whistleblowers anonymous.
The process is easy to achieve thanks to the excellent selection of masking and tracking options available in DaVinci Resolve.
To apply the blur effect to a subject’s face:
- Import the video clip with the subject’s face you wish to blur
- Edit the clip to its correct length and starting position
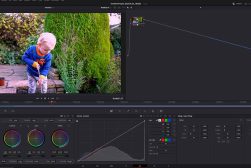
- Head over to the Color page and select the Window option to create a mask
- Using the circle mask, draw a circle around the face of the subject you wish to blur out
- Next, go to the Tracker window and track forward to ensure the face is tracked as the clip plays
- Go to the Open FX library in the top right-hand corner of the screen and search for “blur.”
- From the list, choose the blur type you wish to apply and drag it onto the Node to the right of the clip preview
- Make any adjustments to the blur face effect until you’re happy with the results
Perhaps the most popular blur effect for faces is the mosaic blur, for which you can alter the pixel frequency to make it more or less blocky.

Once you’ve masked the face, you can drag the desired blur effect onto the node to the right of the preview window and adjust the settings.
Using masks to blur objects

Adding and tracking masks to objects in DaVinci Resolve makes it simple to blur sensitive information in your shots.
The steps you need to take to blur objects in DaVinci Resolve are similar to those for blurring subjects, albeit utilizing different masking tools.
Like the face blur, this technique is ideal for disguising personal information such as a license plate or sensitive documentation.
Here’s how you can mask objects in DaVinci Resolve:
- Import the video clip with the object you wish to blur
- Edit the clip to its correct length and starting position
- On the Color page, select the Window tab and choose the most appropriate type of mask for the desired object
- Once the object has been masked, head to the Tracker window and track forward to ensure it’s tracked to account for any camera motion
- Repeat steps 6 – 8 used to blur the subject’s face
Adding blur to backgrounds

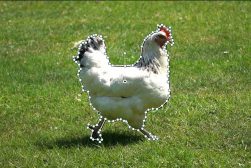
By inverting a tracked mask around your subject, you can introduce blur to the background.
Another great way this useful effect can be applied in DaVinci Resolve is to blur background details to help the subject stand out.
Here’s an overview of how to add blur to backgrounds in DaVinci Resolve:
- Import the video clip with the subject and background you wish to blur
- Edit the clip to its correct length and starting position
- On the Color page, select the Window option and use the pen tool to draw around the subject
- Track forward on the Tracker window to ensure the subject is correctly masked throughout the clip
- Click the Invert button on the pen tool options so that the mask is applied to the background
- Repeat steps 6 – 8 used to blur the subject’s face
Making a cool-looking blurry background has plenty of scope for creativity, with various options in the blur tab to choose from.
If you want to introduce a traditional background blur akin to in-camera bokeh, you can use the Gaussian blur to achieve this look.
You can add a directional blur or motion blur to give the impression of extra speed to a moving object with a blurred trail heading to the left of right.
By applying a radial blur, you can also enhance the impression of motion for cars and other subjects moving directly toward the camera.
How do I blur part of a video in DaVinci Resolve
Sometimes, it may not be necessary to blur a subject or object for the full duration of a video clip.
It may be that sensitive information isn’t clear until the object is close enough to the camera for the viewer to see it clearly.
For example, you may only need to blur out a license plate when the car has pulled to a stop close to the camera.
If this is the case, you can easily blur the relevant part of the video by breaking up the clip and creating a new clip where the blur needs to be added.
You can then apply the blur effect to the new clip so it doesn’t affect the rest of the shot.


