


How to Merge & Flatten Images in Photoshop
Master the technique of merging and flattening images in Photoshop to streamline your editing process while reducing the file size of your projects.
Photoshop | Software | By Judyth Satyn
This guide will give you the easiest ways to flatten images in Photoshop.
I’ve been using Adobe Photoshop for many years and need to flatten my images a lot for design work.
Flattening images is the final editing stage, but it also helps save disk space and streamlines the editing process.
Let’s dive into the tutorial.

Download a free copy of Adobe Photoshop to follow along with this simple tutorial.
Table of Contents
How to Flatten or Merge an Image in Photoshop in 4 Different Ways
Layers are brilliant when you require editing freedom. They separate your image components so you can edit one component without affecting another component.
Sometimes, when editing in Photoshop, we can get carried away (and not without good reason: Photoshop is fun).
However, this can result in a congested, disorganized layer panel.
Layers are important and give you editing freedom, but too many and the Layer panel will become difficult to navigate.
In this tutorial, we will discuss different ways to flatten an image in Photoshop.
We will also cover when to flatten an image, plus the difference between flattening and merging layers.
When you flatten an image, you combine all the visible layers together.
The flattened document will look exactly the same as the image appears in the canvas workspace.
All layers will be forever deleted when you flatten an image, and it is impossible to edit image components separately.
Why Flatten an Image
Normally, an image is flattened at the end of an editing project when the editor is completely satisfied with the final product.
Flattening an image decreases its size and makes printing or uploading it to the web easier.
Image editors flatten or merge layers to organise the Layer panel and streamline their workflow.
The fewer layers there are in the Layer panel, the easier it will be to navigate.
Merging or flattening an image is also a good practice when sending PSD documents to clients.
A client doesn’t need to see all the extra fiddly bits of workable layers. Plus, a compressed file will look more professional.
Layers increase the size of a PSD file. Therefore, images are flattened to reduce the size of a large PSD file for saving or sending.
Flattening images helps Photoshop run smoother.
If you have a PSD file with lots of layers, you will find that Photoshop will start running slower.
This is because Photoshop needs a lot of disk space to operate.
If you find that Photoshop is slowing down, try merging layers that you don’t need to edit separately anymore.
The Difference between Merging and Flattening
Using Photoshop, you can flatten the entire image into one layer or merge selected layers.
Photoshop gives different options to merge layers. For example, merging selected layers, merging a group of layers or merging visible layers.
While merging and flattening sound very similar, they are different.
When you flatten an image in Photoshop, you will combine all the layers in the Layer panel into one layer.
Not one layer will be excluded.
The merging action allows you to select which layers you wish to combine into one layer.
Thus, you can leave layers in the Layer panel unmerged.
The flattening action will add a white colored background to any transparent areas.
The merging action leaves transparent areas as they are.
Merge an image instead of flattening it if you want to retain any transparent background.
You can merge an entire PSD file into one layer.
However, unlike the Flatten action, you must individually select each layer in the Layer panel to merge them.
So now we know why we would want to flatten an image, let’s look at how to flatten an image.
Option 1. Flatten an Image
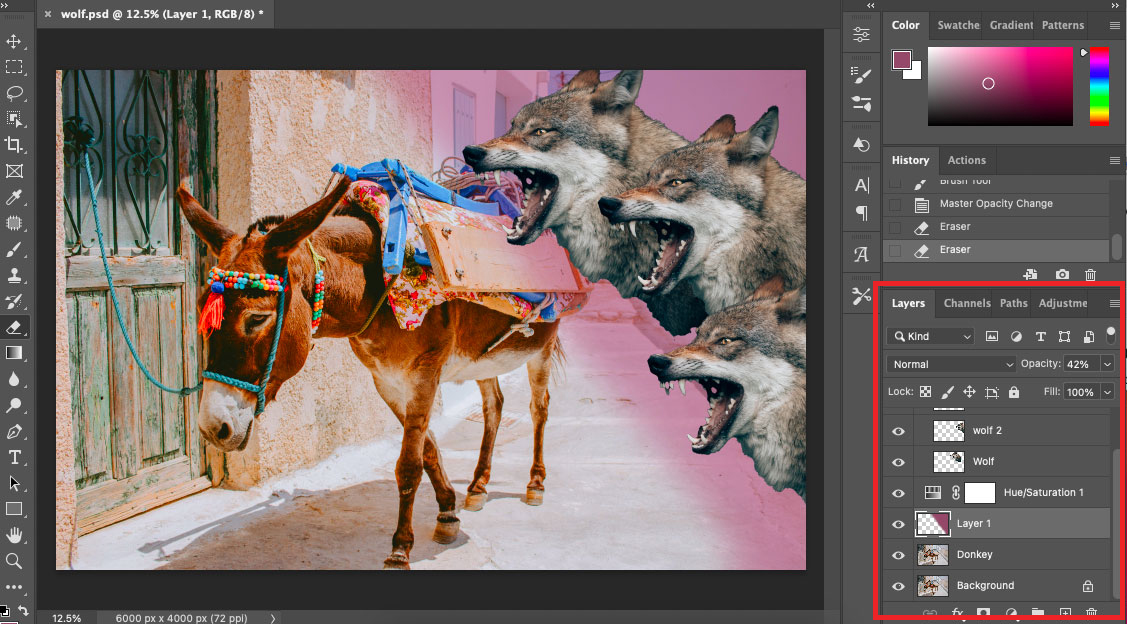
As you can see in the document below, the PSD file has many layers in the Layer panel.
There is a very simple, quick process to flatten all the layers in the Layer Panel without selecting each layer seperately.
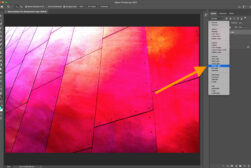
To flatten the image, head to the top menu bar and select Layer > Flatten Image.
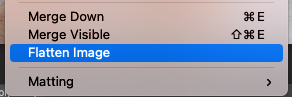
Alternatively, right-click on any layer in the Layer panel. This will open a dropdown menu. Scroll down the dropdown menu and select Flatten Image.

Once selected, Photoshop will merge all the PSD document layers into one layer.
As you can see in the image below, the layers have been flattened into one background layer.

If you realize flattening the image wasn’t a good idea, and you wish to undo the edit.
Hold Command and press Z (for Macs) or Ctrl plus Z (for Windows). This will undo any previous edits.
Unfortunately, there is no keyboard shortcut to flatten an entire image in Photoshop.
But this could be a good thing. Nobody wants to flatten their image and delete all its layers accidentally.
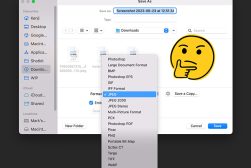
When you have flattened your image, you can save it as either a TIFF, PNG, or JPG.
Go to File > Save as, and a pop-up window will open.
Enter a name for the new document, select a location, choose to export as a TIFF, JPG, or PNG, and hit save.
Option 2. Merge Visible Layers
Merge visible layers will flatten the entire PSD file, but only when all the layers in the Layer panel are visible.
If all the layers are not visible, the invisible layers will remain.
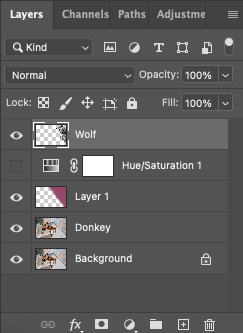
Visible layers are depicted by an eye icon beside their layer thumbnail.
If a Layer is not visible, there will be no eye icon beside it’s thumbnail.
As you can see in the image below, only one layer is not visible, the layer named “Wolf 2”.

To merge visible layers, head to the top menu bar and select Layer > Merge Visible.
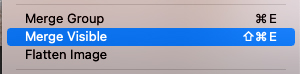
Alternatively, use the keyboard shortcut by hitting Shift, Command plus E (for Macs) or Shift, Ctrl plus E (for Windows).
As you can see in the image below, all the visible layers have been merged into one background layer.
While the layer named “wolf 2” has been left unmerged.

Note: Merge visible layers when you are happy with the visible image and no longer wish to edit these layers separately.
Ensure there are no components or layers with important information that you wish to keep.
One way to avoid losing important editing information is to save the image as a PSD file and also as a flattened image (TIFF, JPEG or PNG file).
This way, if you realize you need to re-edit the image after it has been printed or uploaded, you will have the option to do so.
3. Merge a Group or Folder into a Single Layer
After editing a group of layers, you can merge the group into one layer.
If all the layers in the Layer panel are in one group, this will merge the entire PSD file into one layer.
When you merge layers during editing, you will reduce the PSD file size.
This helps cut down on the computer overload. Your processor will thank you by responding faster to editing prompts.

To merge a group or folder together, activate the group in the Layer panel.
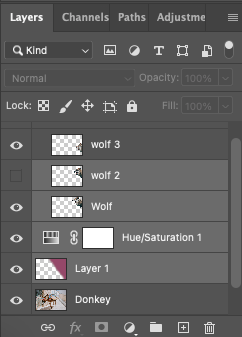
As you can see below, only the Wolf folder is active in the Layers panel.
The Wolf folder contains three separate layers.

It is worth noting that only the visible layers will remain in the layer. Any invisible layer will be deleted.
Head to the top menu bar and select Layer > Merge Group.
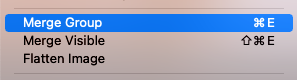
You can use the same keyboard shortcut for groups and individual layers: Command plus E (for Macs) and Ctrl plus E (for Windows).
As you can see in the image below, the Wolf folder has been merged into one layer named ‘Wolf.’
All the other layers in the Layer panel remain unaffected.
A group is the best way to organize your layers in the Layers panel without merging them together.
However, although a group of layers is combined as one, it still takes up the space of a few layers.
Merging a group is useful for reducing the size of the PSD document.
4. Merge Selected Layers
Instead of merging a group of layers or visible layers, you select individual layers to merge.
Select the layers you wish to merge in the Layer Panel by holding the Command Key (for Macs) or Ctrl key (for Windows).
With the key held down, click on the layers in the Layer panel.
Each layer will turn from dark grey to light grey, indicating that it has been selected, as in the image below.
When you have selected all the layers you wish to merge together, head to the top menu bar and select Layers > Merge Layers.
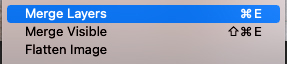
To merge selected layers via the keyboard shortcut, use Command plus E (for Macs) or Ctrl plus E (for Windows).
As you can see in the image below, only the selected layers have been merged, whether visible or not.
The selected layers are merged regardless of whether they are in a group or not.

Merging your images as you go will help speed up Photoshop, making editing easier.
Now, you have everything you need to merge and flatten images in Photoshop.
Remember that there is no return when you merge or flatten an image.
You can undo the flatten action while working on the open document, but once you have flattened and saved the image, all the layers will be fused together.
So be sure that you are happy with the final product before flattening it.
If space isn’t an issue, you can save the flattened image as both a JPEG and a PSD file.
This is what I prefer to do, as sometimes, after flattening a PSD file, I realize I need to reposition a subject or alter an aspect.
Re-edit isn’t always necessary, so saving PSD files is a little bit of overkill.
I hope this tutorial helps smooth out your editing workflow; enjoy editing.
If you want to learn more about editing in Photoshop, try this tutorial – How to Flip an Image or Layer in Photoshop (3 Simple Ways)
FAQs About Flattening Images in Photoshop
How do I make an image flat in Photoshop?
To make an image flat in Photoshop, head to the top menu bar and select Layer > Flatten Image.
How is an image flattened?
When an image is flattened in Photoshop, all the layers are merged together.
All the layers will be discarded, and only the flattened image will remain.
This means it will not be possible to re-edit the image as a PSD file with layers when the image is saved.
Is there a shortcut to flatten an image in Photoshop?
There is no keyboard shortcut to flatten an image in Photoshop.
But you can right-click on any layer in the Layer panel and scroll down the drop-down menu to select Flatten Image.
Why does my image change when I flatten it in Photoshop?
The image can change when flattened because Photoshop has to work hard to display an accurate version of an image if there are many layers.
When you are working with an image with many layers, you will use a lot of RAM.
If Photoshop doesn’t have sufficient RAM, it can slow down, impacting the preview it generates in the canvas workspace.
This is particularly obvious when you are zoomed in or out of the image and not on 100%.
Should I flatten an image before printing?
Yes, you should flatten an image before you print it.
Essentially, you don’t have to, but flattening the image will decrease the size, making it easier to print.
What is the difference between merging and flattening layers in Photoshop?
When flattening layers in Photoshop, all the PSD file layers will be combined into one layer.
When merging layers, only select layers will be merged together.
What is the purpose of flattening an image in Photoshop?
The purpose of flattening an image in Photoshop is to combine all the layers into one image.
When an image has only one layer, its size is reduced and can be saved as a TiFF, PNG or JPEG.
Flattening an image is usually the final step of editing when the final look has been achieved.


Judyth is an experienced studio photographer and glass artist. When she isn’t Photoshopping comedians into the bellies of sharks, you can find her cooking delicious treats for her guests.
WELCOME TO SHOTKIT
Enter your email to be sent
today's Welcome Gift:
19 Photography Tools
🔥 Popular NOW:


Shotkit may earn a commission on affiliate links. Learn more.