


All the Best Ways to Crop in GIMP (Step by Step Guide)
Discover the best methods for cropping images in GIMP to remove unwanted sections of your images, backgrounds, layers or selections.
GIMP | Software | By Jeff Collier
This guide to how to crop in GIMP will help you remove these useless borders from your image in no time!
Cropping allows you to trim down your image into a smaller one, so you can focus more on the main subject of your image.
The problem is that GIMP might seem like complex software, but when you get into it, you’ll find that cropping is easier than you think!
In this article, you’ll learn all the techniques for cropping an image in GIMP.
Keep reading to trim your pictures to perfection!
Table of Contents
What Is the Crop Tool in GIMP?

We use GIMP’s crop tool to trim certain parts of the image. It works on all file formats and all layers of the photo.
You don’t need to be an expert to use this tool. It’s super simple and easy to use.
Additionally, if you have any experience with Photoshop’s crop tool or cropping in Lightroom, cropping pictures in GIMP will be a breeze.
How to Crop Layer in GIMP

Layering can help you create composite images by adding different elements on top of each other.
But what if you want to crop only one layer of your image?
Luckily, you can do that using GIMP, and there are two ways to do so.
The first technique automatically removes a part of a consistent background, like a solid white or black area.
So, it doesn’t work well with complex images with many details.
The second technique, on the other hand, allows you to highlight the area you want to crop manually.
Here’s what you need to do to crop a layer in GIMP automatically:
- Go to the Layers panel at the bottom right corner of the software.
- Select the layer you want to crop by clicking on its thumbnail.
- Open the Layer menu.
- Click “Crop to Content.”
Need a more professional edit? Here’s how to manually crop a layer:
- Go to your layers panel.
- Click on the thumbnail of the layer you want to crop.
- After that, switch to the Crop tool from your toolbox or use the shortcut “Shift + C.”
- In the Crop menu, make sure that “Current layer only” is on.
- Next, define the area of your image that you want to keep by dragging the crop tool.
- If you’re happy with the result, press enter to confirm.
How to Crop Selection in GIMP

Struggling with the crop tool? You can use GIMP’s selection tool to crop your image!
Although it doesn’t offer a lot of features, like the crop tool, it can get the job done.
To do a crop selection, just follow these easy steps:
- Open the selection tools menu.
- Then, click on any of the selection tools, like the Ellipse Select or the Rectangular Select tool.
- After that, go to the Image menu and click on “Crop to Selection.”
How to Crop Background in GIMP
Removing the background of your image might seem like a hassle, but GIMP made it easier with its incredible tools.
To crop the background of your image, you can use the Fuzzy Selection tool or the Paths one. Additionally, if your background is one solid color, you can use the Color tool to remove it.
The Fuzzy Selection Tool
The Fuzzy Selection tool allows you to select areas of your image with similar colors. It’s similar to Photoshop’s Magic Wand tool.
But how can you use it to remove the background?
Well, it’s simple, and all you need to do is follow these steps:
- Start by opening the image you want to edit.
- Then, right-click on your active layer and select “Add Alpha Channel.”
- Go to the Tools menu and click on Selection Tools
- Then, click on the Fuzzy Select menu. You can also press the “U” keyboard shortcut to reach it.
- Next, use the magic wand to select the parts you want to remove from the background. The tool will highlight other areas that match the color of these parts.
- Press the delete button to remove the selected areas.
- Use the Fuzzy Selection tool again to remove any remaining areas in the background.
The Paths Tool
We mainly use the paths tool to create complex selections. Yet, it works well in this situation.
By creating a path around the main object in your picture and excluding the rest, you can remove the background.
It might require a little bit of patience, though. On the bright side, you can get the cleanest results with this tool.
Here’s how to use the Paths tool to remove the background of your image:
- Go to your toolbox and click on “Paths tool.”
- Start creating paths by left-clicking around your main object. You want the paths to exclude the background and include all the main objects.
- To create curves, hover over the line selection, click, and drag.
- After that, you need to close the path by hovering over the first node. Then, hold the control key with a left click.
- Finally, click on the “Select” menu and choose “From Path.” You’ll be able to remove the background with the delete key.
The Color Tool
If your background is one solid color, you can use this tool to remove it, and here’s how to do so:
- Head to “Tools” and click on “Selection Tool.”
- Then, select the “By Color” tool.
- After that, right-click on the active layer and add an alpha channel to your image.
- Next, click on the background and hit delete.
How to Auto Crop in GIMP
Does this process sound like a hassle for you? Well, GIMP has an incredible auto-crop tool that’ll make your life much easier.
This smart tool searches through your active layer for the largest border area with the same color. Then, it crops this area from your photo, just as if you used the manual crop tool.
It might not be accurate every time, but it gets the job done quickly.
You can find this tool in the “Image” menu. Just click on “Autocrop Image,” and you’re good to go.
How to Crop and Resize an Image in GIMP
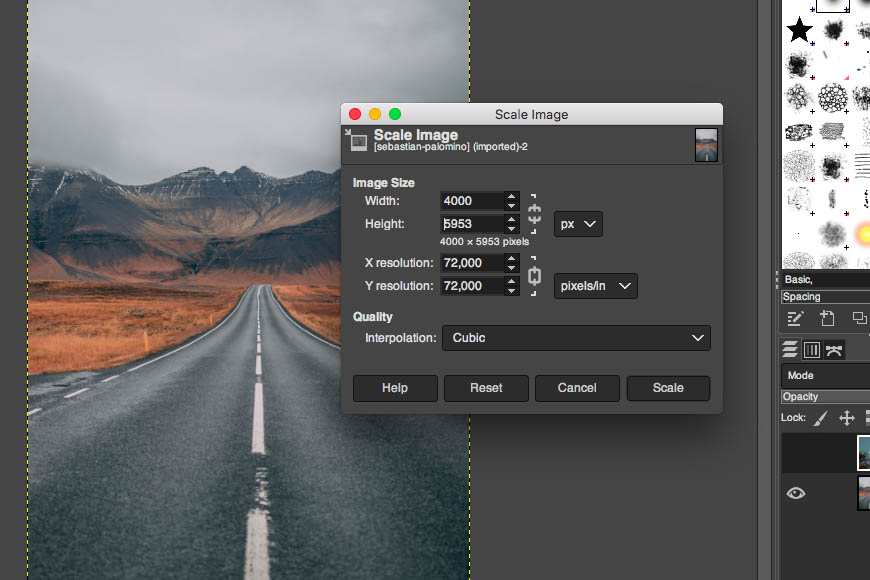
What happens when the original image is just too big and cropping it isn’t enough?
That’s where the resizing tool comes in handy.
Here’s how to crop and resize an image in GIMP:
- Open the image you want to edit and crop it if needed.
- Then, open the “Image” menu and click on “Scale Image.”
- After that, you can adjust your photo’s width and height values.
Remember that if you change one of these values, the other one will change to maintain the same aspect ratio.
How to Crop an Image in GIMP Using the Lasso Tool

GIMP has a variety of selection tools that make the editing process a breeze, and the Lasso tool is no exception.
Using the Lasso tool is like holding scissors that allow you to cut out parts of your image manually.
The best part is that you can use it to remove irregular shapes from your image.
It might need a little more precision, but the results are always impressive.
Here’s how to use the Lasso tool to crop your photos:
- Open the Lasso tool from the toolbox or use the “F” keyboard shortcut.
- Then, you can click and drag to outline your main object. You can also click once to set your first point and then click again to draw a selection line.
- You must close the shape by returning to the start point to complete your selection. If you double-click, GIMP will automatically draw a straight line to the start point and close the selection area for you.
- Once you have a closed selection area, you can delete it.
How to Crop Irregular Shape in GIMP
We’ve discussed various cropping methods in our article, but which one is best for an irregular shape?
After many trials, we’ve found that the “Paths” tool works best for shapes with lots of straight lines. Alternatively, you might want to try the “Lasso” tool for more complex shapes.
How to Crop Image to Shape in GIMP

Cropping sounds easy now, right? But what if you want to crop an image into a shape?
Spoiler alert: It’s as simple as it gets.
Let’s assume you want to crop your image into a triangle.
You’ll need to open the image, head to the toolbox, and pick the Paths tool.
Then, make a triangular path around your shape.
You can try using the Ellipse selection tool to create a circular image.
Pro tip: if you want your background to be transparent after cropping the image, you need to add an alpha channel.
How to Crop Image to Specific Size in GIMP

To crop your image to a specific size, open your image and head to the Tool Options.
Then, make sure that the “Fixed” option is on and select “Aspect Ratio.”
After that, you can adjust the size of your image.
 Gimp vs Photoshop – Why Pay to Edit Your Photos in 2023?
 18 Best GIMP Plugins of 2023 + Installation Guide
 Photo Editing With GIMP: 10 Popular Techniques in 2023
 How to Remove Background of an Image Using GIMP (4 Easy Ways)
 Top 11 Alternatives to GIMP in 2023 (Free, Open-Source & Online)
 13 Photoshop Selection Tools (How & When to Use Them)

Jeff Collier is an experienced film photographer who enjoys experimenting with modern digital photography equipment, software and apps. He’s also an ex-world champion triathlete and avid cyclist, clocking hundreds of km each week in the beautiful Tweed Valley of northern NSW, Australia.
WELCOME TO SHOTKIT
Enter your email to be sent
today's Welcome Gift:
19 Photography Tools
🔥 Popular NOW:


Shotkit may earn a commission on affiliate links. Learn more.