


Best Lightroom Export Settings for Instagram in 2023
Find out which Lightroom export settings to use with Instagram in 2023. Don't skip this guide if you want your Instagram posts to look their best!
Lightroom | Software | By Ana Mireles
If you’re a heavy social media user, this guide to the best Lightroom export settings for Instagram will be helpful to you.
With over one billion people using Instagram every month and over 95 million photos uploaded every day, you definitely need your images to stand out!
You may have found that images uploaded to Instagram can look fuzzy, or lower quality to how they originally looked. This is because of the Instagram image compression algorithm, which can degrade quality in favour of a smaller image size.
Fortunately, if you’re an Adobe Lightroom user, it’s simple to ensure your Instagram images look as good as they possibly can.
So, let’s dive right into the exact Lightroom export settings to use.
Popular course reveals the simple tricks to getting incredible results with Lightroom in record time. Give Your Photos The Look They Deserve!
![]()
Table of Contents
How do I Export Best Quality from Lightroom for Instagram?

These are the Best Export Settings for Instagram in Lightroom:
- Image Crop: 4:5
- Image format: JPEG
- Color Space: sRGB
- Quality: 100
- Image Sizing: Resize to fit: Width & Height. (W: 2160px H: leave blank)
- Resolution: 72 pixels per inch
- Output Sharpening: Sharpen for Screen, Amount to personal taste
If you stick to the above export settings, your images should look their best each and every time you upload to Instagram.
To save you some time, I’ve put together these Instagram Lightroom export settings as an Export Preset which you can download for free right here.
Guide to Lightroom Export Settings for Instagram
Here’s a quick definition of what each of the main export settings means:
- Image Crop – This process is to cut your image in a way that fits Instagram’s supported formats. It has to do with the relationship between the shortest and longest side (aka, the aspect ratios).
- File Format – This is the way your image is stored on your device.
- Color Space – This controls how colors are represented. Each device uses a different one and that is one of the reasons why your images may look different on your computer than they do on your phone.
- Quality – The quality of the file is an option offered for JPEG and it has to do with the amount of compression. The higher the quality, the bigger the file.
- Image Sizing – Once you have the ratio between the sides, you need to resize your image so that the longest side doesn’t exceed the maximum allowed by Instagram.
- Image Resolution – Optimize the resolution for online sharing. what resolution should I export from Lightroom for Instagram?
- Sharpen – Increases the edge contrast to make your image look more defined. This is useful because it will lose some of this when it’s uploaded.
Now let’s have a closer look at each of these Lightroom Export Settings in detail to see how they help to make your images look their best.
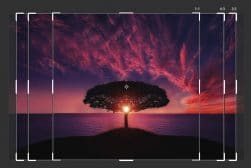
1. Image Crop
Credit: Kristopher Roller
While Instagram became famous for its square images (1:1 ratio), things have changed quite a bit. By now it has become more flexible.
You’ll find that Instagram supports portrait, landscape, and square formats. The width of your photo needs to be between 320 and 1080 pixels.
The official Instagram guidelines also state: “If the aspect ratio of your photo isn’t supported, it will be cropped to fit a supported ratio.”
At this point, the results are not in your hands, and that’s not a position that you want to be in. So, one of the settings that you need to consider for uploading to Instagram is cropping and sizing your image yourself.
Instagram supports most popular image aspect ratios, it’s generally best to crop your images to 4:5, since portrait orientation images take up the most real estate in the Instagram feed.
To do this in Lightroom, you need to go to the Develop module. On the top of the panels, you’ll find the adjustment tools.
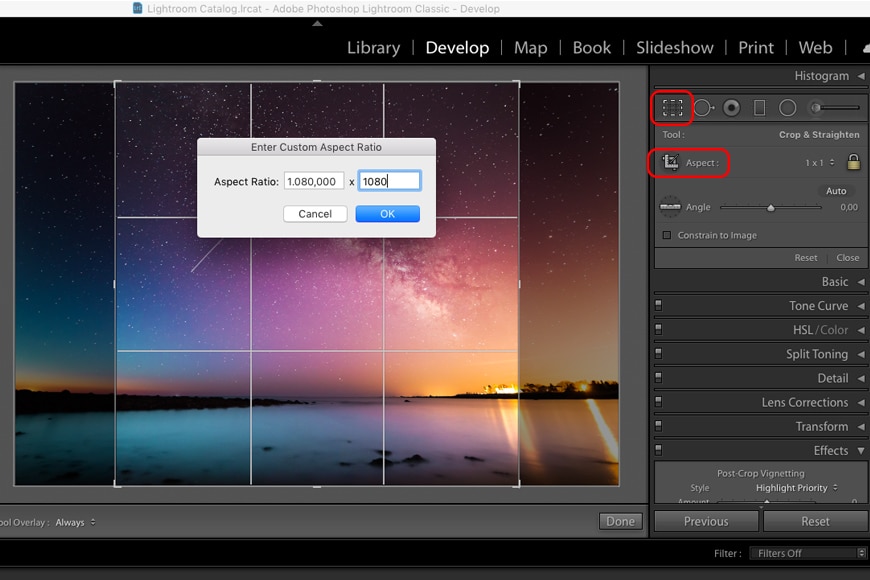
The first one from the left is a square icon – click on that. You’ll see a square and a grid appear on top of your image. That’s the Crop and Straighten tool.
In the panel, you’ll see its settings. The first one is the Aspect, referring to the aspect ratio. By default, it will be set as Original and it will have a padlock on in.
Click on the arrows next to the word Original to open the drop-down menu. From there you can choose which one to use.
Normally you’ll find aspect ratios expressed with a colon separating both numbers, for example, 4:5. Here you’ll see the multiplication symbol (e.g, 4 x 5). It’s the same thing, so don’t let it confuse you.
If you can’t see the aspect ratio that you’re looking for, click on Enter Custom and type the one that you prefer. You can either type the aspect ratio or the number of pixels. The recommended aspect ratios for Instagram are:
- 1080 x 1080 (1:1) for square photos.
- 1080 x 608 (1.91:1) for landscape-oriented photos.
- 1080 x 1350 (4:5) for portrait-oriented photos.
You’ll see a frame that will show you a preview of the crop. By default, it considers the center of the image to make the measurement. If you’re not satisfied with it, you can drag the image to recompose according to the crop. Then click Done.
What are the Dimensions for Instagram?
| Type | Aspect Ratio | Size |
| Square Photo | 1:1 | 1080 x 1080px |
| Landscape Photo | 1.91:1 | 1080 x 608px |
| Portrait Photo | 4:5 | 1080 x 1350px |
| Instagram Stories | 9:16 | 1080 x 1920px |
| IGTV Cover Photo | 1:1.55 | 420 x 654px |
| Instagram Square Video | 1:1 | 1080 x 1080px |
| Instagram Landscape Video | 1.91:1 | 1080 x 608px |
| Instagram Portrait Video | 4:5 | 1080 x 1350px |
You can also check out the other popular social media sizes here.
2. File Format
File format is another of the export settings for Instagram you need to consider.
While you should be taking and editing your photos in RAW format, you should never share a RAW file (not least because of the huge file size). That’s a general rule that you should follow regardless of the platform.
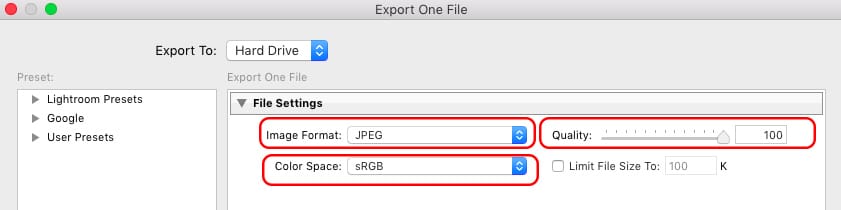
So, once you’re done with your post-production process, export your file as either JPEG or PNG.
Since Instagram doesn’t preserve transparencies, I would recommend using JPEG. However, this is a personal preference and your image won’t lose any quality if you use PNG.
The format of your images can be modified in the File Settings in the export window.
3. Color Space
Different devices work with different color spaces. You’ve probably heard about the two most common: RGB and CMYK.
The RGB (red, green, blue) color space works with additive color theory and it’s mostly used for screens. CMYK (cyan, magenta, yellow, and black) uses a subtractive color theory and is used for printers.
While these are just the basics, there are many more color spaces. I’m not going to dive deep into that, but I will tell you that choosing the right color space for Instagram can make the colors more accurate and vibrant.
By default, Lightroom Classic uses the Adobe RGB color space to display previews, export to PDF, upload, and other actions. But in the Develop module, images display by default in a color space called ProPhotoRGB.
When you’re exporting to share images on Instagram you should change the Color Space to sRGB. You can do this in the File Settings section of the Export window.
4. Quality
When you change the file format in Lightroom, different choices will become available to you – much like what happens in Photoshop.
If you’re exporting your image as a TIFF file, you’ll be able to control compression. If you choose JPEG, which is the best one for Instagram, you can choose the quality.
Keep in mind that the more quality you want, the bigger the file size will be. Since Instagram will run your images through the algorithm anyway, this shouldn’t be a problem.
Some people argue that exporting at 100% is better because a higher quality image will suffer less damage after the compression algorithm.
Others say it’s 76% because this is the sweet spot of the algorithm. You can try it both ways and see which one works better for you.
In any case, I don’t recommend lowering the quality below 76%.
5. Image Size
The fact that you changed the image aspect ratio to, let’s say, 1080 x 1080 doesn’t mean that your image will now be exported to the size 1080 x 1080.
What it means is that it will maintain the relationship between the width and height regardless of the size. For example 5000 x 5000.
That’s why you should also adjust the image size to optimize your images for Instagram. To do this in Lightroom, go to the Library Module.
From there, click on the Export button you’ll find in the left panels. This will open a dialog box where you input the export settings.
Under the Image Sizing section, enable the Resize to Fit option. Here you need to type again the size you typed in the Aspect field. In my example: 1080 x 1080.
Remember that if you intend to post multiple photos on Instagram in one post, you’ll need to maintain the same sizes throughout the carousel for the best appearance.
6. Image Resolution
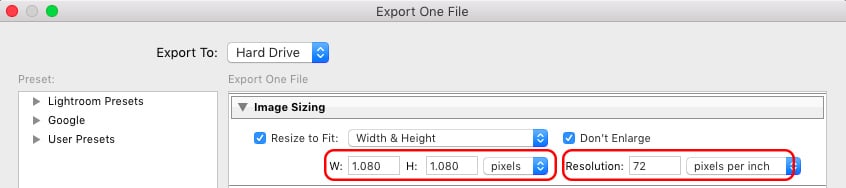
In the same dialog box where you’re resizing your image, you also need to input the resolution.
If you’re asking yourself: what resolution should I export from Lightroom from Instagram?
For digital devices, the standard is 72 ppi (pixels per inch) because anything higher than that won’t be noticeable and would just make your file size larger – see what does PPI mean?
7. Sharpen

Even though your images look great on your computer screen, they often end up looking dull once you upload them to Instagram. That’s why it’s important to add some extra sharpening when Instagram is the final destination of your image.
This will not only ensure that the image looks like you intended it, but also that it will appear as its highest image quality.
When we see an image where the elements and the edges aren’t well defined, we immediately associate it with bad quality.
You can adjust the sharpness of your photo in Lightroom in the Develop Module. Then expand the Detail panel.
The first slider that you can adjust is the Amount. This, as the name says, refers to how much sharpening is being applied to the image.
The next slider is called Radius. Since the sharpening tool works by increasing the contrast on the edges, this defines how many pixels around the edge it should affect. So, a small value gives you a thin edge, while a higher value results in a thicker edge.
Then there’s Detail. This controls how much sharpening is applied to different details. If you drag it to zero, only the bigger edges will be considered; all the way to 100 considers even the smallest details. Be careful because higher values can create noise.
The Masking slider limits the effect to wider or smaller areas. With the slider set to zero, the sharpening applies to the entire image. If you drag it to the right it will apply to fewer areas, until it considers only the strong edges.
If you hold the Alt key while dragging the slider, the image will show black and white and you’ll have a better understanding of how it’s working.
Final Words
Making your Instagram feed load quickly isn’t easy to do when 50 billion images have been uploaded to the platform, and almost 1,000 more are added every second.
So, Instagram has developed proprietary algorithms that make sure things run smoothly. This means that your images are going to be crunched down to reduce their size.
As such, it’s better if you optimize your settings for Instagram when you export from Lightroom – that way you can match the app’s capacity and speed to keep the best quality even after going through the algorithm. The end result? You have more control over the outcome.
To sum up the best Lightroom export settings for Instagram, you need to start in the Develop Module.
First, adjust the aspect ratio to 4:5 for portrait photos, and 1.91:1 for landscape images. Of course, it’s still possible to stick to the classic square image format of 1:1.
Then increase the sharpening. Make sure that it looks a little bit exaggerated because then it will look just right once it’s uploaded to Instagram.
After that, you’re ready to export your photo. In the settings window, look for the Image Sizing section. Here, adjust the size to fit the aspect ratio and make sure the width is no longer than 1080. Then set the resolution to 72 ppi (pixels per inch).
In the File Settings section, set the file format to .jpeg. That enables the image quality slider, which you can crank up to 100. Finally, set the color space to sRGB.
I hope this guide made it easier for you to adjust and export your images using the best settings to improve the image quality on your Instagram feed.
If you have any questions about export settings for Instagram, or suggestions for editing Instagram images in Lightroom, please share them in the comments section below.


Ana Mireles is a Mexican researcher that specializes in photography and communications for the arts and culture sector.

WELCOME TO SHOTKIT
Enter your email to be sent
today's Welcome Gift:
19 Photography Tools
🔥 Popular NOW:


Shotkit may earn a commission on affiliate links. Learn more.