


How to Cut Out an Image in Photoshop
Learn 3 ways to cut out an image in Photoshop and remove the background – with professional results! Follow this easy, step-by-step tutorial.
Photoshop | Software | By Ana Mireles | Last Updated: March 7, 2023
When you were a child, did you cut out images from papers or magazines to then paste together into a collage?
If the answer is yes, then you’re going to love how you can do that in Photoshop – only much more precisely. Cutting out images or subjects to create photo-composites is one of the most appealing uses of this program.
A cut-out image can be used for many different things. Because of the multiple needs and uses, Adobe Photoshop offers numerous tools and techniques that allow you to cut out an image and remove the background.
(You can even remove a background using the free Photoshop app.)
In this article, I’ll show you how to cut out an image in Photoshop with three of the most common methods.

Download the latest version of Adobe Photoshop to follow along with this simple tutorial.
Start a free 7-day trial today
Table of Contents
3 Methods for Background Removal in Photoshop
Let’s start off by saying that a successful cut-out depends on a precise selection. If you don’t do this, things will never integrate realistically.
Of course, you may also want to remove the background of an image to create that paste-on-top effect on purpose. But still, you’d want to do this in a controlled way and not carelessly.
So, the methods that I’m going to show you are different ways to select the subject to cut out. Then, you can remove or replace the background, multiply it, take it to another photo for a Photoshop collage, or anything else you can think of.
(If you’re not a Photoshop user, Apowersoft Background Eraser tool is a handy way to do it with one click.)
Method 1: Quick Select
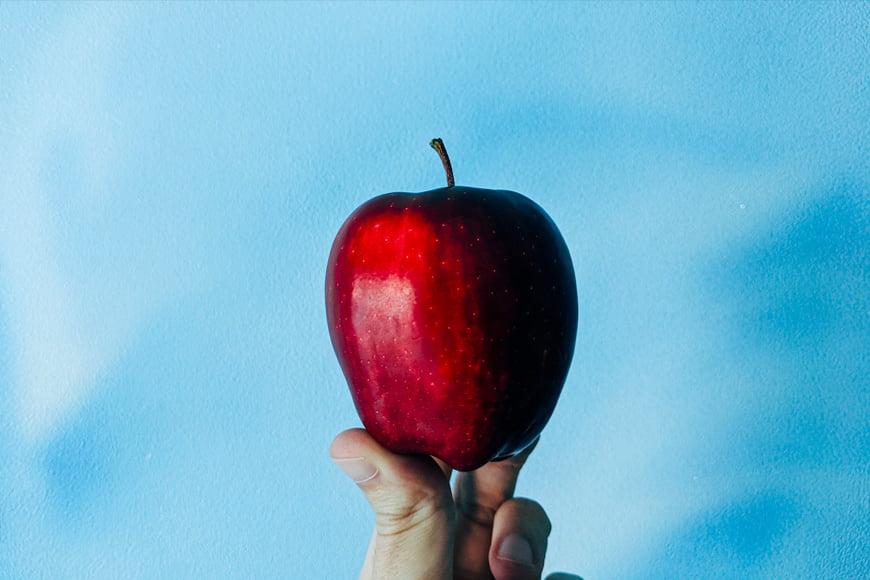
Credit: Markus Winkler
The Quick Select tool is the easiest one to start with if you’re learning how to make a cutout in Photoshop.
This tool is based on a brush that you will use to ‘paint’ the area that you want to select – there are Photoshop plugins that can help with this, but the integrated tool has become so good with the latest versions, that they are no longer necessary.
The wonderful thing about this brush is that you can just make broad strokes, and it will automatically find the edges of the area to make the selection more precise.
So this is a tool that works best when you have large blocks that are clearly separated by color, contrast, or focus.
Let’s take a look at how to cut out an image using this tool.
Step 1: Grab the Quick Selection tool
Adobe Photoshop groups things into sets of tools that work in a similar way. So, as with many other tools in Photoshop, you first have to open the right toolset to find the one you need.
In this case, we want to go to the Tools panel on the left of your screen and find the Object Selection tool. Click and hold on it to open the toolset, and from there you can select the Quick Selection brush.
If Quick Selection was already selected in the toolset, you could simply reactivate it using the keyboard shortcut W.
Step 2: Start painting
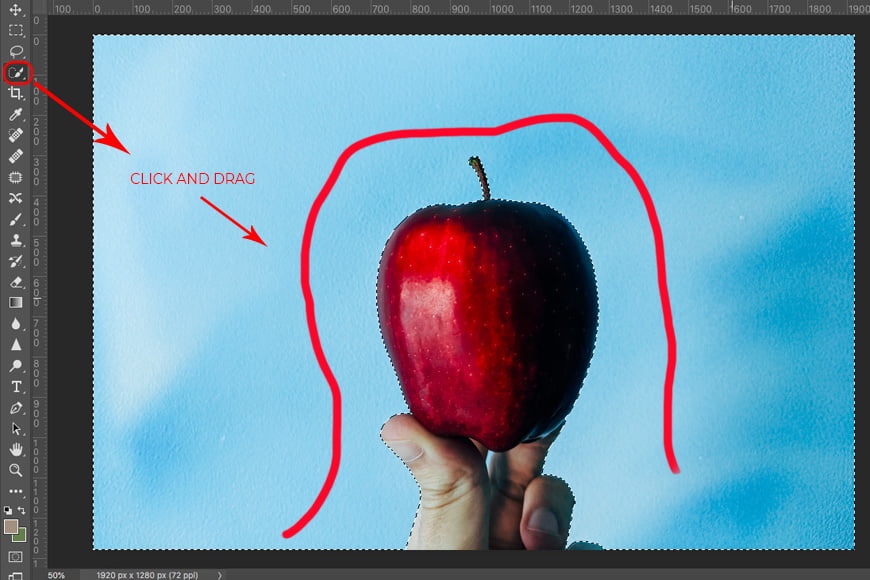
Select the size of your brush depending on the area that you need to select. If it’s too big, you risk going over the edges and selecting something you don’t need.
Then just click and drag. For example, I just dragged the brush around the apple and the brush automatically found the edges and covered the entire blue background.
You can see it’s actually pretty easy learning how to cut out part of an image in Photoshop
Step 3: Fine-tune
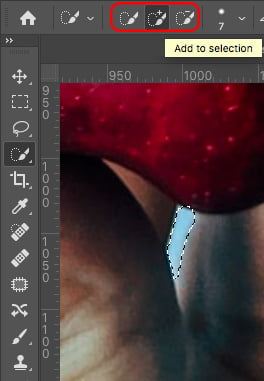
Ok, now all you have to do is zoom in and check your selection. You can add or remove areas by switching between the modes Add and Subtract on the Options bar at the top.
When you’re in the correct mode just click and drag the brush again in the area that needs to be fine-tuned.
Step 4: Cut out
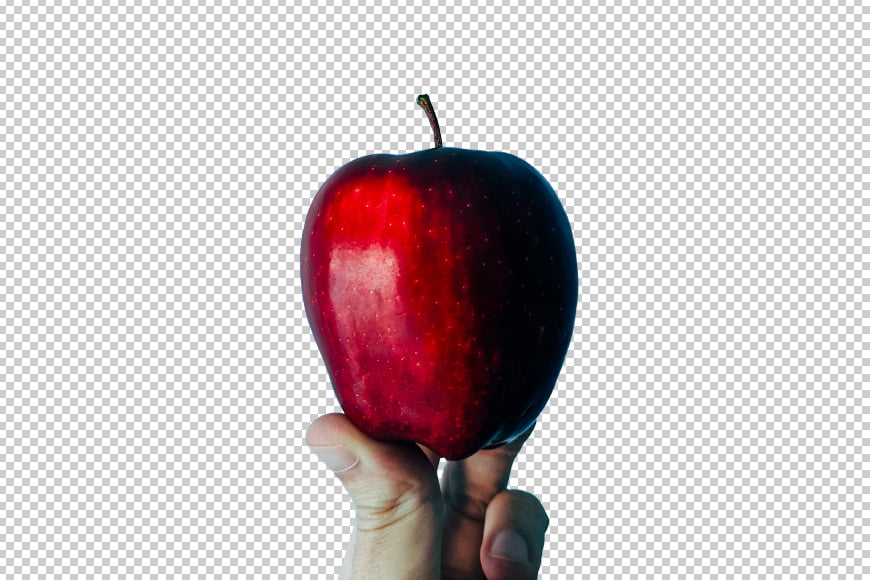
Now that the object you want to cut out is selected, if you want to remove the background you can delete it by pressing the backspace key.
If you want to just hide it instead, use a Layer Mask. This way you’ll always have the chance to make adjustments later on.
Method 2: Select and Mask
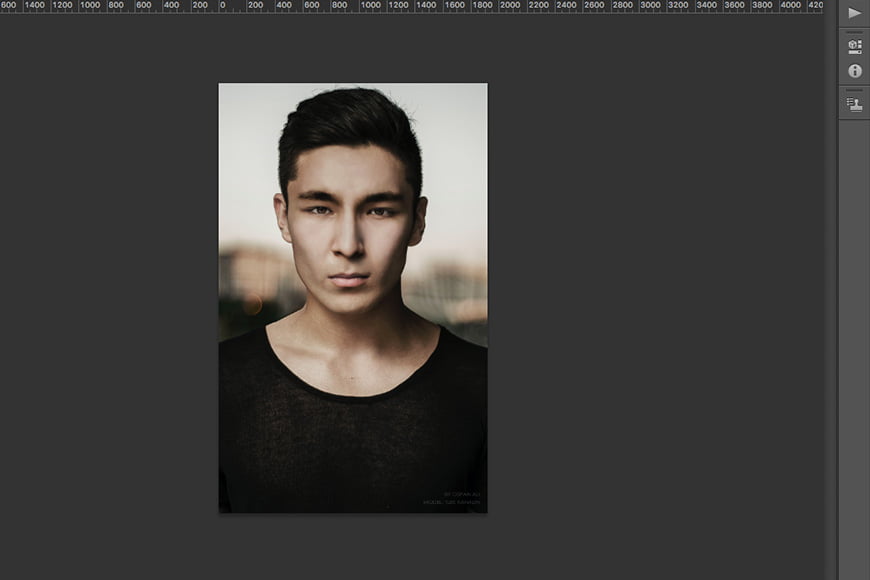
Credit: Ospan Ali
If you’re wondering how to cut someone out of a picture in Photoshop, the Select and Mask tool would be right for you.
The Select and Mask tool was introduced as a replacement for the Refine Edge. So, if you’re using Adobe Photoshop CS6 you won’t find it. It’s more of a task space than a tool.
Because of this, you can use it by itself to do the whole selection process, or as a complement to another tool.
I’m going to show you how to use it to refine a previously made selection. But if you want to do everything with it, you can open it by going to the menu Selection, Select and Mask.
Step 1: Make the first selection
You can do a basic selection using any tool that you feel comfortable with. For example, the Quick Selection tool explained in the previous section.
For my image, Subject Selection will work well, but feel free to use any lasso tool, like the Magnetic Lasso or the Polygonal Lasso.
Step 2: Open Select & Mask

If your selection looks good but still needs some work, you can use Select and Mask. For example, this can help you out when you’re selecting hair or fur.
(See also this guide on image masking in Photoshop.)
Open the task space by clicking on the Select and Mask button from the top bar. It doesn’t matter which tool you used to make your selection – they all display the Select and Mask button. Alternatively, you can open it from the Selection menu.
This will launch the task space.
Step 3: Choose your working background

Before you start adjusting your selection, this workspace allows you to change the way you see your image to facilitate the work.
On the right-hand side, you’ll find the Properties panel. On the top, it has the View Mode. This will allow you to change the opacity of the background, make your selection black on a white background, and a whole range of options.
Choose the one that allows you to see the most detail. You can change this as many times as you need to depending on the area that you’re working on.
Step 4: Refine Edge

On the left side, you have the tools panel. Here you can choose the tool that you want to use.
If you’re dealing with hair or fur like I’m doing, choose the Refine Edge Brush Tool. Determine the size and start painting on the edge that you want to correct.
Step 5: Fine-tune

You can use the sliders on from the Properties panel like Radius or Feather to fine-tune the selection.
Then zoom out and check the overall image. If you find something else that you need to correct, you can use any of the tools from the left panel like the Quick Selection tool.
When you’re done, just click OK and the Select and Mask workspace will close and create a new Layer with a Mask to cut out your image.
(If you want to change the color of an object, see this guide.)
Method 3: Color Range

Credit: Edgardo Bautista Jr.
As the name clearly states, this method for removing background with Photoshop is based on color. You can just sample the color you want to be selected and that’s it.
This is a useful method when you have disconnected areas and small details in one color. Let me show you an example.
Step 1: Open the Color Range box
With your image open in Photoshop, go to the menu Select, Color Range. This will open a dialogue box for you to set the parameters of your selection.
Step 2: Sample the color

Make sure the Sampled Color option is set on the menu.
Then, using the first eyedropper click on the color that you want to select. It’s OK if you don’t see any difference yet. You’ll use the sliders for that.
Step 3: Adjust the Fuzziness.
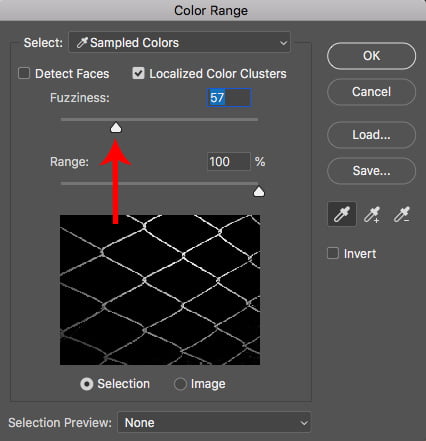
Use the first slider called Fuzziness. Click on it and start dragging it slowly to the right.
As the value comes up, more variations from the color you selected will be included in the selection.
So, continue dragging it until you see the object you want to cut out in full black, but stop before other elements start to appear. The right value will change from image to image.
By the way, you can change the view mode from Selection to Image if that’s more comfortable for you. I find the black and white view to be best for me.
Once you’re happy with it click OK.
Step 4: Refine and Cut Out
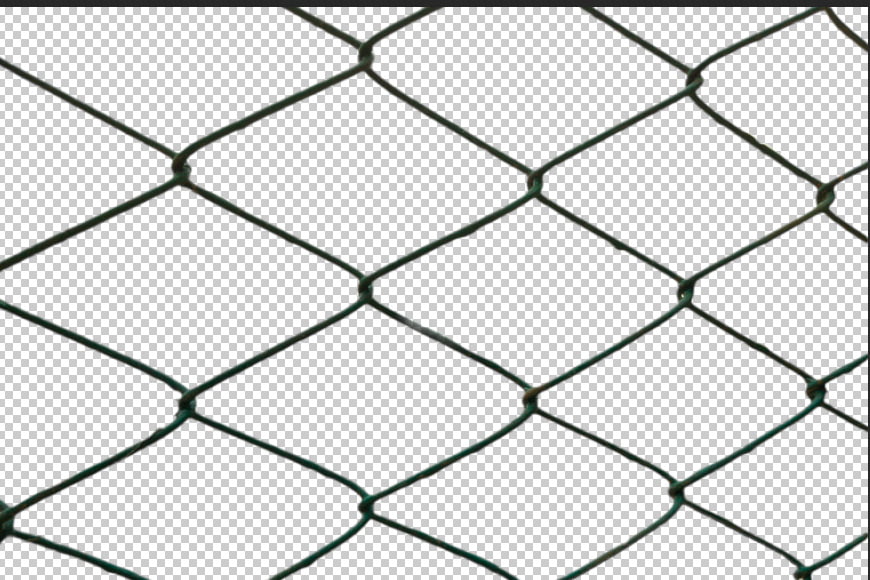
As you can see, this method can save you a lot of the tedious work that you’d otherwise need if you want to cut out an image with other tools.
The downside is that often you have to do some fine-tuning to get it right. This depends on how many variations there are of the color in your picture.
You can fine-tune using any tool. I find the Select and Mask method that I described before to be very efficient for this.
Once you’re done with the selection, add a mask if you want to work non-destructively, or delete the background if you’re sure you won’t need it.
How to Cut Out an Image in Photoshop | Final Words
That’s it. As you can see, cutting out an image in Photoshop can be done using any number of methods. More often than not, you’ll need to combine different tools to get the job done.
If you want to remove the background, just make sure that your selection is as accurate as possible. This will give you the best result for your cut out image.
Once you’ve cut out your image, you can experiment with creating a collage of all your favourite images – check out our guide to creating a grid in Photoshop to learn one simple way to do it.
I hope you enjoyed this tutorial and that you can use it for your upcoming creative projects.
Download the latest version of Adobe Photoshop to follow along with this simple tutorial.
Start a free 7-day trial today


Ana Mireles is a Mexican researcher that specializes in photography and communications for the arts and culture sector.

WELCOME TO SHOTKIT
Enter your email to be sent
today's Welcome Gift:
19 Photography Tools
🔥 Popular NOW:


Shotkit may earn a commission on affiliate links. Learn more.