


How to Crop a Photo in Lightroom Classic (Beginners Guide)
Learn how to crop in Lightroom with this step-by-step guide. Covers all you need to know, from which tools to use to changing aspect ratios.
Lightroom | Software | By Ana Mireles
Cropping an image is to cut part of it. You might want to do this for a number of reasons but you should be aware that you’ll be losing pixels in the process.
Fortunately, Lightroom creates a new version of your photo and this way you’ll always have your original untouched.
So, back to the reasons why you would want to crop. One of the most common reasons is to fit a specific format.
When you’re going to post or print a photo, you need to fit your image to the measurements or aspect ratio requested.
For example, to upload to Instagram you need to optimize your photos to fit any of their aspect ratios. If you’re going to print, you need your photo to be an adequate size for the paper format, etc.
Another cause for cropping is having to straighten the horizon on your photograph. Both tools are actually in the same panel in Lightroom because they’re so often used together.
When you rotate your photo to straighten the lines in it, you’ll leave some areas in the corner without any pixels.
To fix this, the most appropriate action is to crop the image a bit smaller. This is because stretching the image to cover those areas again can make it lose quality.
A common reason to crop an image is to recompose the framing. Maybe you didn’t have a long enough focal length, or you just want to arrange the elements in a better way.
In those cases, cropping your image to get closer to your subject or position the elements according to a specific composition is common practice.
You can also crop to eliminate an unwanted element towards the edge of the corner. Or maybe you want to change the orientation from landscape to portrait, or vice versa.
In sum, you can see that there are many situations in which using the Crop and Straighten tool in Lightroom might come in handy.
This guide will take you through everything you need to know about how to crop in Lightroom.
(See this guide for how to crop a picture into a circle – something Lightroom cannot do.)
Popular course reveals the simple tricks to getting incredible results with Lightroom in record time. Give Your Photos The Look They Deserve!
![]()
Table of Contents
How Do I Crop a Photo in Lightroom?
Learning how to crop in Lightroom is pretty easy as the tool itself is very straightforward. At the same time, however, you do have a lot of flexibility that can make some things a bit confusing.
Here’s a step-by-step guide to help you out.
1. Import your photo
When you open an image in Lightroom, you need to import it to the Library. This way, you’re not working on the original image.
You can do this by going to the menu File, Import Photos and Video. Or you can go to the Library Module and click on the Import button.
Choose an image where cropping is needed. For example, when you need to straighten your photo or change the aspect ratio.
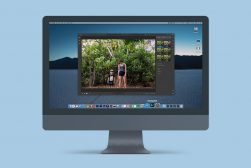
2. Select the Crop Tool
Credit: Ana Mireles
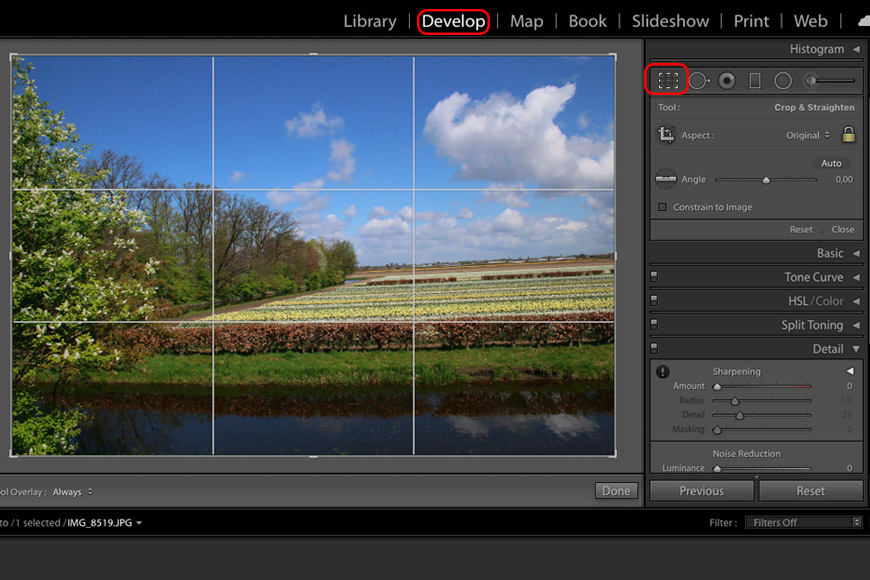
Once your image is in the Library, you can move to the Develop module.
On the right side, just below the Histogram, you have the tools strip.
The Crop tool is the first one from the left. It’s represented with a rectangle icon. Alternatively, you can enable it using the keyboard by pressing the R key.
Once the tool is activated, you’ll see the adjustment panels for it. You’ll also notice that your image now has an outer frame with handles on the corners and halfway along each of the sides.
3. Crop your image
As I mentioned at the beginning, there are many reasons why you would like to crop your image. And Lightroom has different tools to fit your different needs.
Here are some different methods to crop your image depending on what you want to achieve:
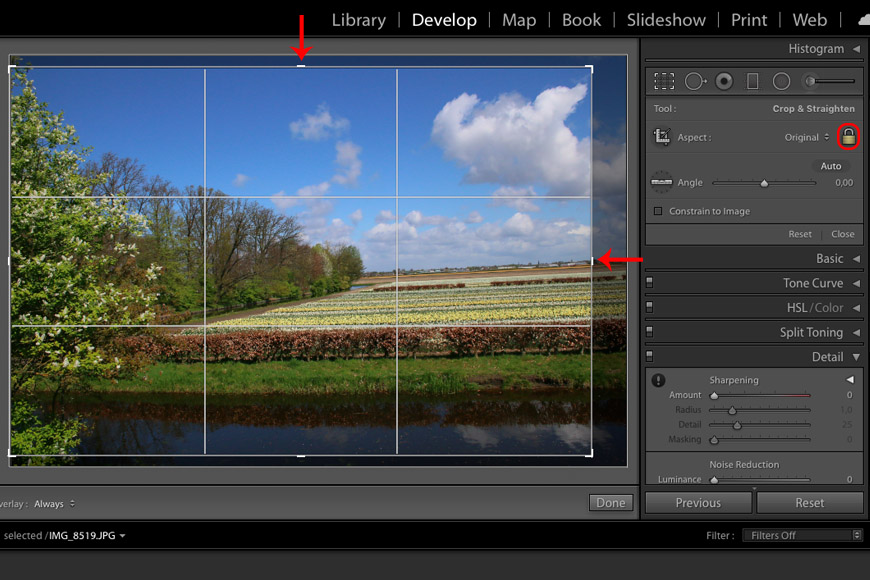
Cut the edge/edges: The most straightforward way to crop in Lightroom is to simply grab any of the handles and drag it.
Note that this is not the most precise method. It’s useful if you just want to crop someone or something out of the photo, and you’re not concerned about a specific size.
The only thing that you need to consider is the aspect ratio. If you want to maintain your photo in the same proportion, make sure that the padlock within the crop panel is closed.
This way when you shorten one side, the others will move accordingly. If you just want to cut one side, open the padlock. You can do that just by clicking on it.
Straighten the horizon: This is a very common problem when you are shooting handheld. Very often the lines can be a little crooked.

To fix this, you need to use the Angle tool inside the Crop & Straighten panel. Now, there are a few ways to go about it.
My personal favorite is to click on the Angle icon. Then click and drag a line across the horizon. Keep in mind that I’m just using the horizon as an example, it can be a fence, a building, or any reference point.
You don’t have to drag it across the entire image, just a segment will do to indicate the direction to Lightroom. When you let go, it will automatically straighten the line and crop the image accordingly.
If you don’t like automated methods, you can rotate the image manually. Place the cursor outside the image. When it becomes a curved-two-pointed arrow just click and drag.
To do the same effect with more accuracy, you can drag the Angle slider until you are satisfied.
Finally, for the utmost precision, you can also type in the exact number of degrees that you want to rotate the image.
Change the composition: Sometimes it’s impossible to get the perfect composition right from the shot. Maybe because you didn’t have the right focal length, or maybe because you’re still not used to seeing that way.
In any case, you can change that by cropping. And, in Lightroom, there are a number of overlays that can help you out.
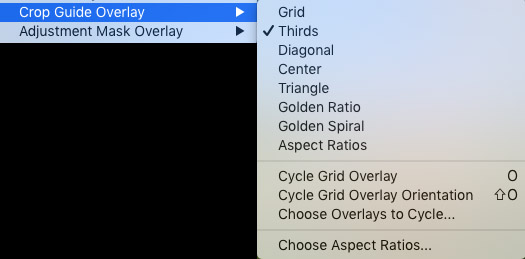
You just have to go to the menu Tools, Crop Guide Overlay, and choose the one that you prefer. There’s the Rule of Thirds, the Golden Ratio, the Golden Spiral, and many others.
You can also adjust when you want the overlay. Underneath the image, there’s a small menu called Tool Overlay.
By default is set to Always, but you can change that to Never or Auto.
Change Aspect Ratio: You know that the aspect ratio refers to the relationship between the height and width of the photo.
By default, Lightroom will set the aspect ratio to Original and it will be locked. This way any changes that you make when cropping or straightening will keep the photo always in the same proportion as it was originally.
If you want to change that, click on the two arrows next to the word Original. This will open the drop-down menu with all the aspect ratios.
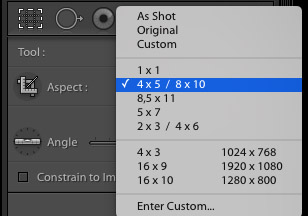
From here you can choose any of the presets offered by Lightroom, which are, of course, the most common.
If none of these work for you, you can also input your own aspect ratio. The last choice from the menu is called Enter Custom.
When you click on it, a dialog box will appear where you can specify the values that you want.
You can use this technique to fit any format that you need for sharing or printing. The frames from the cropping tool will give you a preview of how this will look.
If you find this view a bit distracting, check the Navigator panel on the right. Here you’ll see a thumbnail of the cropped image.
4. Apply
Once you’re happy with the way your image looks, click Done on the bottom of the workspace. Otherwise, you can click the Close button on the Crop & Straighten panel.
Keep in mind that since Lightroom is not working with the original image, you can always come back to change the cropping. Just activate the tool again and modify whatever you need.
5. Export your image
Once your image is done, you can go back to the Library module. There, click on the Export button. This is a necessary step to save the image on your computer, send it to print, etc.
This will open the export window where you can input the settings of the file. If you need your picture in a specific size, you need to specify it here.
Remember that whatever you put within the Lightroom crop tool was the aspect ratio. This just constrained the proportion, it didn’t resize the image.
Lightroom How to Crop FAQ
There’s a lot of confusion surrounding cropping in Lightroom – these are the answers to the most common questions:
Where is the Crop Tool in Lightroom?
To find the Lightroom Crop and Straighten tool you need to be in the Develop module. On the right side, under the histogram, you’ll find the tools. The Crop tool is the first one.
You can also access it using its shortcut by pressing the R key.
What does Constrain Crop mean in Lightroom?
Constrain Crop can refer to maintaining the same aspect ratio in your photo when you crop in Lightroom. If this is what you’re looking for, please check the next question.
If you’re referring to the Constrain Crop option from the Transform panel or the Lens Distortion Panel, that’s a different thing.
When you check this box in any of the panels, you’re constraining those tools to work within the aspect ratio that you have set in the Crop tool.
Also, there’s a Constrain to Image option that appears on the bottom of the Crop and Straighten panel. This prevents any white space inside the crop when you’re doing any transformation.
How do I crop and keep the same aspect ratio in Lightroom?
Keeping the aspect ratio means that the proportion between the long and short sides will remain the same regardless of the cropping.
To ensure Lightroom is preserving the aspect ratio when you crop, check that the padlock in the Crop tool is closed. If it’s open, click on it to lock it. This will constrain the aspect ratio.
How do I customize crops in Lightroom CC?
In the Lightroom Crop and Straighten panel, open the aspect ratio menu by clicking on the double arrows. Then, choose the Enter Custom option.
This will open a dialog where you can input the values for your customized aspect ratio.
How do I crop horizontally / vertically in Lightroom (i.e. how do you crop landscape to portrait?)
To change the orientation of your photo using Lightroom you need to open the Crop tool.
In the Crop tool panel, you’ll see a padlock. If you don’t need a specific measure or ratio, open the padlock by clicking on it. Then, click and drag a handle from one of the sides of the photo and make the crop horizontally or vertically to your liking.
If you want to be more precise, choose an aspect ratio, and leave the padlock locked. Then grab one of the corners (it doesn’t matter which) and drag it all the way to the opposite one. This will make the orientation flip.
Then start dragging horizontally or vertically to expand the crop with the new orientation. Let go of the mouse when you’re satisfied with the result.
How do I crop a picture to a specific size?
This is a two-step process. First, go to the Develop module and set the specific size in the aspect ratio.
You can do this using the Enter Custom command in the Crop and Straighten panel. Let’s say you set it to 8 x 10.
Now, your image will maintain the aspect ratio of 8 x 10 regardless of the size.
In other words, it won’t necessarily be 8 by 10 inches yet – you need to adjust that when you export the picture. You can do that by going to the Library and clicking on the Export button.
Then, in the Export window, look for the section Image Sizing. In there you can input the specific size. In my example, this would be 8 x 10 again.
How do I change the aspect ratio in Lightroom CC?
To change the aspect ratio you need to open the Crop tool. In the panel, set the padlock icon to be open. Next, drag the edges of the crop tool to set manually a new ratio.
If you want to be more precise, open the Aspect drop-down menu in the panel and choose any of the aspect ratios. Or, choose Enter Custom to type in the values that you need.
Final Words
In conclusion, it’s very simple to learn how to crop in Lightroom, yet you have a lot of possibilities.
Hopefully, this article cleared up your doubts. If not, feel free to ask us a question in the comments section.
You should also read our article on how to crop an image in Photoshop.
 Which Aspect Ratio is Best for your Photo or Video?
 How to Use Cropping to Enhance your Photos
 4:3 vs 16:9 – Which Aspect Ratio is Best for Videos & Photos?
 12 Best Adobe Lightroom Alternatives in 2023 [User Tested]
 Lightroom CC Mobile Guide
 What’s the BEST Way to Buy Lightroom in 2023? (For All Budgets)

Ana Mireles is a Mexican researcher that specializes in photography and communications for the arts and culture sector.
WELCOME TO SHOTKIT
Enter your email to be sent
today's Welcome Gift:
19 Photography Tools
🔥 Popular NOW:


Shotkit may earn a commission on affiliate links. Learn more.